RSS구독하기:SUBSCRIBE TO RSS FEED
즐겨찾기추가:ADD FAVORITE
글쓰기:POST
관리자:ADMINISTRATOR

심볼릭 링크와는 또 다른 기능

드라이브 문자 자체에 폴더를 링크

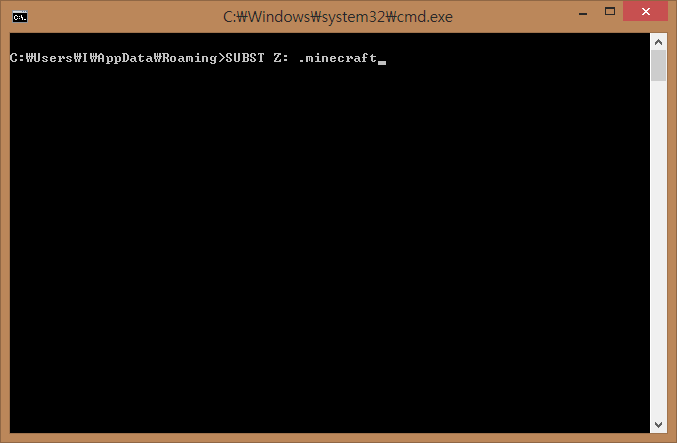
  하나의 심볼릭 링크 파일에 경로를 링크하는 심볼릭 링크와는 달리, SUBST는 드라이브 문자 그 자체에 경로를 링크합니다. 즉, Z 드라이브 문자(Z:)에 C:\Program Files 폴더를 바로 링크할 수 있다는 것이죠.

SUBST 사용 방법

  SUBST의 사용 방법은 아주 간단합니다.

  SUBST 드라이브_문자 경로명이죠.

  할당을 해제할 때엔 SUBST /D 드라이브_문자를 입력하시면 됩니다.

  현재 할당된 드라이브 문자를 보시고 싶으면 그냥 SUBST만 입력하시면 됩니다. 쉽죠?

  더욱 자세한 설명 및 사용 방법은 역시 아래의 동영상을 보시면 됩니다.

  언제나 유용한 정보를 제공하려 노력하고 있습니다. SUBST를 사용하시면서 더더욱 편리한 컴퓨팅 환경을 만드실 수 있길 바랍니다.

  즐거운 하루 되세요.

출처 : http://honsal.tistory.com/entry/Assign-Folder-to-Drive-Letter-SUBST-2014-03-25

2015/10/26 12:19 2015/10/26 12:19
이 글에는 트랙백을 보낼 수 없습니다

mWebView = (WebView) view.findViewById(R.id.webview); // 웹뷰 아무거나 붙혀서...


WebSettings webSettings = mWebView.getSettings();
webSettings.setJavaScriptEnabled(true);


CookieSyncManager.createInstance(mWebView.getContext());
CookieManager cookieManager = CookieManager.getInstance();
cookieManager.setAcceptCookie(true);
//cookieManager.removeSessionCookie(); // remove
cookieManager.removeAllCookie(); //remove
// Recommended "hack" with a delay between the removal and the installation of "Cookies"
SystemClock.sleep(1000);


cookieManager.setCookie("https://my.app.site.com/", "cookiename=" + value + "; path=/registration" + "; secure"); // ;
CookieSyncManager.getInstance().sync();


mWebView.loadUrl(sp.getString("url", "") + end_url);


    return view;
}
2015/10/16 16:30 2015/10/16 16:30
이 글에는 트랙백을 보낼 수 없습니다

먼저 .gradle 폴더

사용자 삽입 이미지

  1. From Android Studio, go to File > Other Settings > Default Settings.
  2. Select Gradle.
  3. Change Service directory path to desired folder.
  4. Save the setting.

디폴드 값은 아래와 같다.

C drive (usually C:\Users\yourusername\.gradle)


Android Virtual Devices

사용자 삽입 이미지

아래와 같이 화경변수 등한다.

  1. Close Android Studio if any.
  2. Move .android folder (usually at C:\Users\yourusername\.android) to destination drive (e.g. D:\Android)
  3. From Windows, go to Control Panel > System > Advanced system settings
  4. Go to Advanced tab > Environment Variables.
  5. Under System variables, click New... button.
  6. Type in the following:
    Variable name: ANDROID_SDK_HOME
    Variable value: D:\Android
  7. Click OK and OK again.

Cache Folder

사용자 삽입 이미지

Our last step is to move presumably cache folder for AS. This involves editing a text file of AS to tell AS to refer to custom location for cache folder.

  1. Close AS if any.
  2. Move .AndroidStudio to destination drive (e.g. D:\Android)
  3. Go to the folder where AS is installed (e.g. C:\Program Files\Android Studio).
  4. Go to bin directory and edit idea.propertis file using your favourite text editor.
  5. Uncomment and edit the following two lines. Point them to new location:
    idea.config.path
    idea.system.path

행복한 안드로이드 프로그래밍이 되길 기원하다 ^__^;

2015/10/14 13:13 2015/10/14 13:13
이 글에는 트랙백을 보낼 수 없습니다
웅쓰:웅자의 상상플러스
웅자의 상상플러스
전체 (379)
게임 (5)
영화 (2)
기타 (23)
맛집 (5)
영어 (2)
대수학 (3)
형태소 (5)
Hacking (9)
Linux (112)
HTML (48)
Application_developing (48)
Web_developing (102)
Window (11)
«   2015/10   »
        1 2 3
4 5 6 7 8 9 10
11 12 13 14 15 16 17
18 19 20 21 22 23 24
25 26 27 28 29 30 31
  1. 2016/01 (1)
  2. 2015/12 (3)
  3. 2015/10 (3)
  4. 2015/03 (2)
  5. 2015/01 (4)